
A water elevator is one of the fastest and safest ways to move vertically in Minecraft. It works in both Java and Bedrock editions and is used in bases, towers, mines, farms, and even underwater builds. Water elevators use bubble columns to push players up or pull players down. These bubbles also give you air, so you can breathe underwater inside the elevator.
In this complete guide, you will learn how to make a water elevator in Minecraft with step-by-step instructions, full details, helpful tips, advanced knowledge, and real game mechanics.
Water elevators are perfect for moving inside tall bases and towers. If you want more build inspiration, you can check our minecraft house ideas for creative designs.
What You Need and Where to Find Each Item

Image source: game8.co.com
To build a perfect water elevator, you need a few items. Here is deeper information on each one and where to get them.
1. Glass Blocks
Glass blocks make the enclosure. You can use other blocks, but glass lets you see the bubbles inside, which looks much better.
How to get glass:
- Mine sand from deserts, beaches, or rivers
- Smelt sand in a furnace to turn it into glass
Pro tip:
Tinted glass does NOT affect bubble columns. You can use any glass type.
2. Water Bucket
One water bucket is enough for the entire tube.
How to craft:
- 3 iron ingots in a V shape
Where to get water:
- Any river, ocean, lake, swamp, or even a cauldron (in Bedrock)
3. Kelp
Kelp is the most important item because it turns flowing water into source blocks.
Where to find it:
- Any ocean biome
- Grows from ocean floor
Why kelp is essential:
- Bubble columns require 100% source blocks
- Flowing water will never create bubbles
- Kelp instantly converts flowing water into source blocks
4. Soul Sand
Soul sand creates upward bubbles.
Where to find it:
- Soul Sand Valley in the Nether
- Ancient cities
- Bastion treasure rooms (sometimes)
Mechanic:
When placed under source water, soul sand produces bubble columns that push players upward at high speed (Java: 2.8 blocks/sec, Bedrock: 3.0 blocks/sec approx).
5. Magma Block
Magma creates downward bubbles for descending.
Where to find it:
- Nether
- Ocean ravines
- Sometimes in ruined portals
Mechanic:
Pulls players downward slowly but safely, removing fall damage risk.
6. Bone Meal (Optional but helpful)
Bone meal helps fast-grow kelp.
Instead of manually placing kelp block by block, you place one kelp at the bottom and bone-meal it to the top in seconds.
Step-by-Step Guide to Build a Water Elevator

Image source: minecraft.wonderhowto.com
Step 1: Build the Glass Enclosure
Make four tall glass columns in a rhombus shape (a diamond shape). The center must have one empty block.
Important tips:
- Leave a two-block high entrance
- The enclosure must be fully sealed
- Height can be anything: 10 blocks, 50 blocks, or even build limit
A well-sealed tube prevents water from escaping and keeps bubble flow consistent.
Step 2: Add a Door or Signs
Place a door or two signs at the bottom entrance.
Why this matters:
- Water stays inside
- You can walk through without blocking the path
- Signs work in both Java and Bedrock
- Doors create a clean, simple entry
This step is required because water will pour out if the entrance is open.
Step 3: Fill the Tube With Water
Climb to the top and place one water bucket.
Water will flow to the bottom, but it will be flowing water.
Flowing water = no bubbles
Source water = bubbles work
So this elevator is not functional yet.
Step 4: Convert All Water to Source Blocks Using Kelp
Go inside the elevator and place kelp starting from the bottom.
Keep placing kelp upward until you reach the top.
Why this works:
- Every time kelp grows or is placed, the water block it enters becomes a source block
- This is the fastest way to fill a tall tube with source water
Pro tip:
To speed it up, place one kelp at the bottom and use bone meal to grow it to the top instantly.
Step 5: Remove All Kelp
Go back down and break the bottom kelp block.
All kelp will break at once.
The water now remains as pure source blocks—perfect for bubble creation.
Step 6: Add Soul Sand or Magma
Finally, replace the bottom block with either:
Soul Sand → Up Elevator
Creates upward bubbles
Pushes you up very fast
No drowning inside
Magma Block → Down Elevator
Creates downward bubbles
Pulls you down safely
No fall damage
Most players build two elevators side-by-side:
Up (soul sand) and Down (magma).
Deep Understanding: How Water Elevators Work
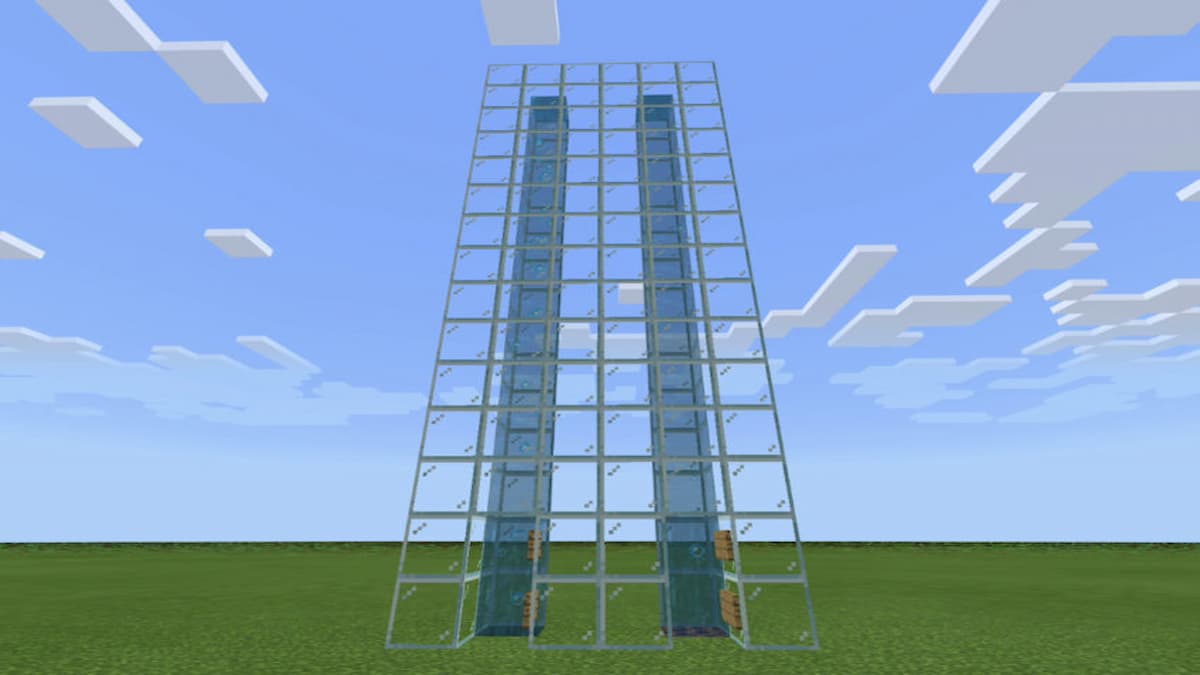
Image source: gamepur.com
To make your article stronger, here is the core game mechanic in very simple words.
What Actually Creates the Elevator?
The elevator works because of bubble columns.
How Bubble Columns Form
A bubble column is created when:
- A water source block is above
- A soul sand or magma block is below
What Happens in Java vs Bedrock
Bubble behavior is almost the same in both versions, but:
- Java has slightly stronger upward push
- Bedrock lets players breathe longer inside bubbles
Why Players Don’t Drown
Bubble columns constantly refresh your breath meter.
This lets you stay inside the elevator underwater forever.
Advanced Tips and Smart Tricks

Image source: freepik.com
1. Use Colored Glass for Style
Blue glass looks good for water builds.
Black stained glass gives a modern style.
2. Add Lights
Sea lanterns, shroomlights, or glowstone prevent mob spawning near the elevator.
3. Add a Roof on Top
A roof prevents zombies, spiders, or phantoms from falling inside your elevator.
4. Add a Floor Stop
If your elevator is very tall, you can make “stop floors” using trapdoors to exit at different heights.
5. Use Two Elevators
One for going up
One for going down
This makes moving inside your base smoother.
Troubleshooting: Why Your Elevator Might Not Work

Image source: freepik.com
Here are common problems with solutions:
1. No Bubbles
Reason: Water is not source blocks
Fix: Place kelp again from bottom to top
2. Bubbles Stop in the Middle
Reason: Air pocket inside
Fix: Break the air block and refill water
3. Water Leaks Out
Reason: No door or signs
Fix: Re-place door or signs at entrance
4. Soul Sand Not Working
Reason: Water still flowing
Fix: Kelp needed again
Best Places to Use Water Elevators

Image source: pinterest.com
Water elevators are helpful in:
- Mountain bases
- Underwater houses
- Sky bases
- Deep mines
- Mob farms
- Trading halls
- Long towers
- Storage rooms
They save time, look clean, and make movement simple. If you’re working on inside rooms and floors, our Minecraft bedroom ideas can help you design cozy and creative spaces.
Conclusion
A water elevator is one of the smartest and fastest ways to travel in Minecraft. It is simple to make but very powerful. With just glass, water, kelp, soul sand, and magma, you can build a safe and fast vertical transport system. Now you fully understand how to make a water elevator in Minecraft, why each step matters, how bubble mechanics work, and how to improve your elevator with smart building tips.
FAQs for How to Make a Water Elevator in Minecraft
1. What materials do I need to make a water elevator in Minecraft?
You need glass blocks (or any solid block), water, kelp, soul sand, and a magma block. A door or signs are also required to stop water from leaking out.
2. Why is kelp necessary for a water elevator?
Kelp turns flowing water into source water. Bubble columns only work with source water, so kelp is needed to make the elevator function correctly.
3. What does soul sand do in a water elevator?
Soul sand creates upward bubbles that push the player up very fast. It is used for the “up” elevator.
4. What does a magma block do in a water elevator?
A magma block creates downward bubbles that pull the player down. It is used for the “down” elevator.
5. Why is my water elevator not working?
Most elevators fail because the water is not fully turned into source blocks. Place kelp from bottom to top again. Also remove any air pockets and make sure soul sand or magma is at the bottom.
6. Can water elevators be built in both Java and Bedrock editions?
Yes. Water elevators work the same in both Java and Bedrock editions, and the building steps are identical.
7. How do I stop water from flowing out of the elevator entrance?
Place a door or two signs at the entrance. They keep the water inside but let you walk through easily.
8. Do water elevators let you breathe underwater?
Yes. Bubble columns refresh your air bar, so you will not drown inside a water elevator.
9. Can I build the elevator for both up and down travel?
Yes. Many players make two elevators side-by-side—one with soul sand for going up and one with magma for coming down.